Hello everyone!
I hope you are all well.
Introduction
ASP.NET SignalR is a library for ASP.NET developers that makes developing real-time web functionality easy. SignalR allows bi-directional communication between server and client. Servers can push content to connected clients instantly as it becomes available.
In this tutorial, I am gonna show you how you can create a real-time chat UWP application using Azure Mobile App and SignalR. You can easily implement cool features of Azure Mobile App like user authentication and push notifications along with SignalR bi-directional communication to create awesome real-time apps.
Create a new Azure Mobile App backend
Follow these steps to create a new Mobile App backend.
- Log into the Azure Portal.
- In the top left of the window, click the +NEW button > Web + Mobile > Mobile App, then provide a name for your Mobile App backend.
- In the Resource Group box, select an existing resource group. If you have no resource groups, enter the same name as your app.At this point, the default App Service plan is selected, which is in the Standard tier. The App Service plan settings determine the location, features, cost and compute resources associated with your app. You can either select another App Service plan or create a new one. For more about App Services plans and how to create a new plan in a different pricing tier and in your desired location, see Azure App Service plans in-depth overview
- Use the default App Service plan, select a different plan or create a new plan, then click Create.This creates the Mobile App backend. Later you will deploy your server project to this backend. Provisioning a Mobile App backend can take several minutes; the Settings blade for the Mobile App backend is displayed when complete. Before you can use the Mobile App backend, you must also define a connection a data store.
Configure the server project
- Back in the Mobile App backend settings, click Quick start > your client platform.
- Under Create a table API, select C#:
Click Download, extract the compressed project files to your local computer, open the solution in Visual Studio, build the project to restore the NuGet packages, then deploy the project to Azure. To learn how to deploy a .NET backend server project to Azure, see How to: Publish the server project in the .NET backend SDK topic.
You Mobile App backend is now ready to use with your client app.
(Taken from here)
Now, we are ready to install SignalR package to our Mobile App.
Right Click your Mobile App project and click Manage NuGet Packages… as shown below.

Select the Browse tab if it’s not already selected and search for SignalR and select Microsoft.AspNet.SignalR package. Then click Install

Click OK to the first popup and accept the second one.
It should now create a Scripts folder.
Ready to write some code?
Create a ChatMessage.cs class inside the DataObjects folder.
Add the following code.
This file contains bidirectional Unicode text that may be interpreted or compiled differently than what appears below. To review, open the file in an editor that reveals hidden Unicode characters.
Learn more about bidirectional Unicode characters
| public class ChatMessage | |
| { | |
| public string Username { get; set; } | |
| public string Message { get; set; } | |
| } |
Create a new folder under your project’s root and name it whatever you want. I named mine Hubs.
Create a new class inside your folder named ChatHub.cs.
Add the following code.
This file contains bidirectional Unicode text that may be interpreted or compiled differently than what appears below. To review, open the file in an editor that reveals hidden Unicode characters.
Learn more about bidirectional Unicode characters
| public class ChatHub : Hub | |
| { | |
| public void Send(ChatMessage message) | |
| { | |
| Clients.All.broadcastMessage(message); | |
| } | |
| } |
The SignalR Hubs API enables you to make remote procedure calls (RPCs) from a server to connected clients and from clients to the server. In server code, you define methods that can be called by clients, and you call methods that run on the client. In client code, you define methods that can be called from the server, and you call methods that run on the server. SignalR takes care of all of the client-to-server plumbing for you.
- void Send(ChatMessage message) will be invoked by the clients
- Server will broadcast this message to every connected client by Clients.All.broadcastMessage(message)
Simple right?
Last but not least, open the Startup.cs class which is located in your project’s root and add app.MapSignalR(); below ConfigureMobileApp(app);
This will map SignalR to the app builder pipeline.
And that’s it! Your mobile app service is ready.
Create your UWP Client Application
Let’s create our UWP Application.
Start by creating a new project by going to File->New->Project->Visual C#->Windows and select Blank App (Universal Windows) and name it whatever you want.
Then, right click your UWP project and click Manage NuGet Packages… like before.
Select the Browse tab if it’s not already selected and search for SignalR and select Microsoft.AspNet.SignalR.Client package this time. Then click Install
When it’s ready, create the same ChatMessage.cs class like before and place it wherever you want.
I am gonna use a simple data binding mechanic. If you need more info on what data binding is start here.
Create a class named ChatMessageViewModel.cs this will be used to represent our Chat Messages on our view.
This file contains bidirectional Unicode text that may be interpreted or compiled differently than what appears below. To review, open the file in an editor that reveals hidden Unicode characters.
Learn more about bidirectional Unicode characters
| public class ChatMessageViewModel | |
| { | |
| public ObservableCollection<ChatMessage> Messages { get; set; } = new ObservableCollection<ChatMessage>(); | |
| } |
Then, open App.xaml.cs and declare the following public variables
This file contains bidirectional Unicode text that may be interpreted or compiled differently than what appears below. To review, open the file in an editor that reveals hidden Unicode characters.
Learn more about bidirectional Unicode characters
| public ChatMessageViewModel ChatVM { get; set; }; | |
| public HubConnection conn { get; set; } | |
| public IHubProxy proxy { get; set; } |
Add the following code inside the App.xaml.cs
This file contains bidirectional Unicode text that may be interpreted or compiled differently than what appears below. To review, open the file in an editor that reveals hidden Unicode characters.
Learn more about bidirectional Unicode characters
| public App() | |
| { | |
| this.InitializeComponent(); | |
| this.Suspending += OnSuspending; | |
| SignalR(); | |
| } | |
| public void SignalR() | |
| { | |
| conn = new HubConnection("http://<your-mobile-app>.azurewebsites.net"); | |
| proxy = conn.CreateHubProxy("ChatHub"); | |
| conn.Start(); | |
| proxy.On<ChatMessage>("broadcastMessage", OnMessage); | |
| } | |
| public void Broadcast(ChatMessage msg) | |
| { | |
| proxy.Invoke("Send", msg); | |
| } | |
| private async void OnMessage(ChatMessage msg) | |
| { | |
| await Windows.ApplicationModel.Core.CoreApplication.MainView.Dispatcher.RunAsync(CoreDispatcherPriority.Normal, () => | |
| { | |
| ChatVM.Messages.Add(msg); | |
| }); | |
| } |
This will create the connection to our mobile app service, connect to our ChatHub
and register to broadcastMessage event which means, when the server sends a broadcastMessage message to us, OnMessage handler will be invoked.
The OnMessage handler adds the received message to our ObservableCollection, Messages, and the Broadcast method is used to send the message to our service by invoking the server-side Send method.
Our Logic is ready!
Now, the only thing left is creating our View. Let’s use the MainPage for that.
This file contains bidirectional Unicode text that may be interpreted or compiled differently than what appears below. To review, open the file in an editor that reveals hidden Unicode characters.
Learn more about bidirectional Unicode characters
| <Page | |
| x:Class="ChatApplication.MainPage" | |
| xmlns="http://schemas.microsoft.com/winfx/2006/xaml/presentation" | |
| xmlns:x="http://schemas.microsoft.com/winfx/2006/xaml" | |
| xmlns:local="using:ChatApplication" | |
| xmlns:d="http://schemas.microsoft.com/expression/blend/2008" | |
| xmlns:mc="http://schemas.openxmlformats.org/markup-compatibility/2006" | |
| mc:Ignorable="d" | |
| > | |
| <RelativePanel> | |
| <TextBox x:Name="name" RelativePanel.AlignRightWithPanel="True" RelativePanel.AlignLeftWithPanel="True" RelativePanel.AlignTopWithPanel="True"></TextBox> | |
| <ListView x:Name="lv" ItemsSource="{Binding Messages}" RelativePanel.Above="rp" RelativePanel.AlignLeftWithPanel="True" RelativePanel.AlignRightWithPanel="True" RelativePanel.Below="name"> | |
| <ListView.ItemTemplate> | |
| <DataTemplate x:DataType="local:ChatMessage"> | |
| <StackPanel Orientation="Horizontal"> | |
| <TextBlock> | |
| <Run Text="{x:Bind Username}"></Run> | |
| <Run Text=": "></Run> | |
| <Run Text="{x:Bind Message}"></Run> | |
| </TextBlock> | |
| </StackPanel> | |
| </DataTemplate> | |
| </ListView.ItemTemplate> | |
| </ListView> | |
| <RelativePanel x:Name="rp" RelativePanel.AlignBottomWithPanel="True" RelativePanel.AlignLeftWithPanel="True" RelativePanel.AlignRightWithPanel="True"> | |
| <TextBox x:Name="text" RelativePanel.AlignLeftWithPanel="True" RelativePanel.LeftOf="send" ></TextBox> | |
| <Button x:Name="send" RelativePanel.AlignRightWithPanel="True" Content="Send" Click="send_Click"></Button> | |
| </RelativePanel> | |
| </RelativePanel> | |
| </Page> |
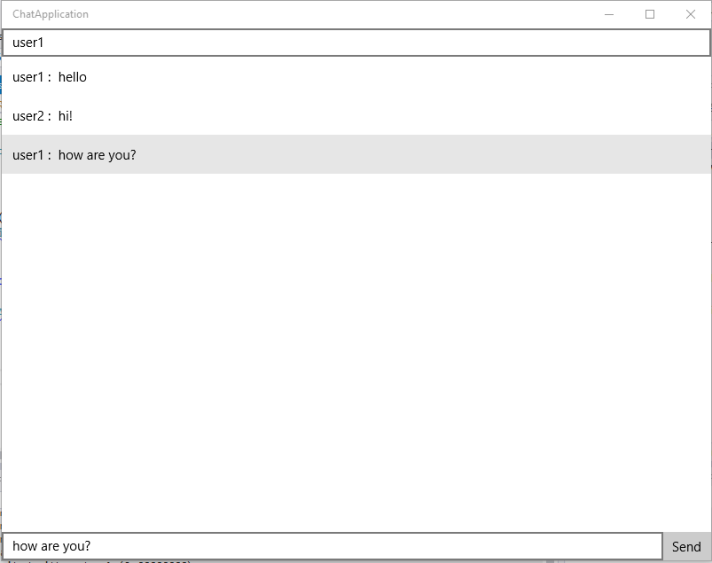
That’s my super simple View. I am using a TextBox for the username, a ListView for the messages, which uses the Messages ObservableCollection as it’s ItemSource, one more TextBox for the message we would like to send and a Button.
This file contains bidirectional Unicode text that may be interpreted or compiled differently than what appears below. To review, open the file in an editor that reveals hidden Unicode characters.
Learn more about bidirectional Unicode characters
| public MainPage() | |
| { | |
| this.InitializeComponent(); | |
| this.DataContext = (Application.Current as App).ChatVM; | |
| } | |
| private void send_Click(object sender, RoutedEventArgs e) | |
| { | |
| (Application.Current as App).Broadcast(new ChatMessage {Username = name.Text, Message = text.Text}); | |
| } |
And that’s the MainPage code behind the view.
I am just setting the DataContext of the MainPage to our ChatMessageViewModel and invoking the Broadcast method when the user clicks the button.
And voila! That’s it!
Of course, you can follow the same logic to improve it with features like who’s online right now or private messaging. Also, you can even use push notifications and user authentication offered by Azure Mobile Apps easily.
You can find the GitHub repo here.
Thanks for reading!
George
I’m just starting to learn to about uwp and I find this app interesting. I am interested in seeing how the app works. So I downloaded the Github repo and simply opened in Visual Studio 2015 and made it to run in (x86) target mode…and I’m getting an error–(An Exception of type System.InvalidOperationException occured in Microsoft.AspNet.SignalR.Client.dll but was unhandled in user code)–
I’m looking forward to solution for the above error,,,
Also the changes that needs to be done in order to make it work…(like references to data connection)..
Expecting a speedy reply…
LikeLike
Have you deployed the Service project to your Azure Mobile App Service and changed the URL in your UWP app?
LikeLike
No ….
How should I change that??
And sorry for this noobie question :(…
Because I’ve spent so much time in creating that manually, but that didn’t work. Hence I downloaded your GitHub repo and simply ran the chat application.
Details on the changes to be made will be highly appreciable!!
LikeLike
Start my tutorial from the very start and you will be ready to go 🙂
It includes how to create a new Mobile App Service.
LikeLike
Hi,geo94,Thanks for your sharing.
Follow your step ,I have a Problem when I try to install SignalR nugget package to a uwp app, It says:package restore failed. rolling back package changes for “MyUwp”, How to fix it ,I need your help,Thanks
LikeLike
Hi,Thanks for your sharing. Follow your step,I have a problem When I Install SignalR nugget package for my “UwpApp”,It says: package restore failed. rolling back package changes for”UwpApp”,select the last stable signalR version “2.2.0” .Can you help me to fix it, any help will be thankfull
LikeLike
@jake.chen Hello, glad that you found it useful! Hmm are you sure that you tried to add the Client version of SignalR package to your project?
LikeLike
HI Ge94. I have test it ,it work fine me .But I don’t know how to send and receive private message ,and rich media message,Can we keep communication ,I want your help.
LikeLike
Hi, there I was just going through your tutorial and following it step by step. Awesome explanation, I got all the points but I got stuck at the MainPage.xaml.cs part
private void send_Click(object sender, RoutedEventArgs e)
{
(Application.Current as App).Broadcast(new ChatMessage { Username = name.Text, Message = text.Text });
}
It says that ChatMessage does not contain a definition for Username and Message
So I made properties in class ChatMessage named Username and Message to fix this but when I started my application and clicked on send buttons it crashed
LikeLike
Hello Desmond,
glad that you liked it!
Can you paste here the exact exception thrown in order to help you?
George
LikeLike
Thanks for your quick response 🙂
And I think the exception is: “Object reference not set to an instance of an object”
or maybe its due to something that I saw during debugging when it passed proxy.Invoke method
where it said: WaitingForActivation in Microsoft.AspNet.SignalR.Client.IHubProxy.Invoke
LikeLike
Do you know in which line this exception is thrown?
LikeLike
This line: { ChatVM.Messages.Add(msg); }
It threw System.NullReference exception.
LikeLike
@georgechond94, bug has been fixed. What I did wrong was that I made all the user defined functions at the end of the App.xaml.cs page so that I wouldn’t have problem finding them.
Not sure why that fixed the bug though. But anyway, thanks a lot !!
LikeLike
Sorry for not answering before, I was AFK all day long. Glad that you fixed it!
LikeLike
Waiting on you, I did check a couple of times that I didn’t leave anything out from your tutorial if you are wondering so I don’t know what has gone wrong
LikeLike
0 Pingbacks